Convert a Windows Installation into a unRAID (KVM) Virtual Machine

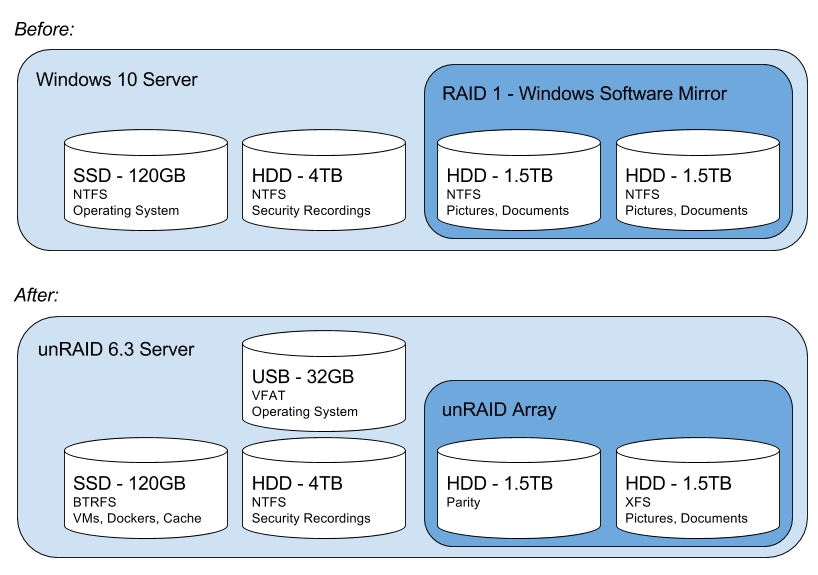
Because I was turning my Windows 10 Pro server into an Linux (unRAID) machine I already had a Windows installation running on the bare metal that I had spent a fair bit of time setting up. I didn’t want to lose that installation and the work put into it. So, rather than starting over with a fresh Windows installation I took the operating system that was already installed, copied it, and started running it as a virtual machine (VM). Here are the steps I took to convert that Windows installation into a functioning VM.

Most of these steps come from the well-written unRAID Manual on Physical to Virtual Machine Conversion – the main thing I add in here are the Windows-specific steps for reducing the size of the virtual machine image.

They’re also useful for anyone running KVM as a hypervisor – not just specific to unRAID.

Before you begin

  • Makes sure you have access to your Windows license. If you upgraded from Windows 7 or 8 to Windows 10 for free this is really important. If you haven’t already, follow the steps here in “Before you shutdown Windows”.
  • Your hardware must be capable of processor virtualization (Intel VT-x or AMD-V), and it must be enabled in your BIOS. Depending on what you plan to do with your VM, you may need to meet other hardware requirements.
  • unRAID must have VMs enabled and configured. An important step here is to download the VirtIO Drivers ISO
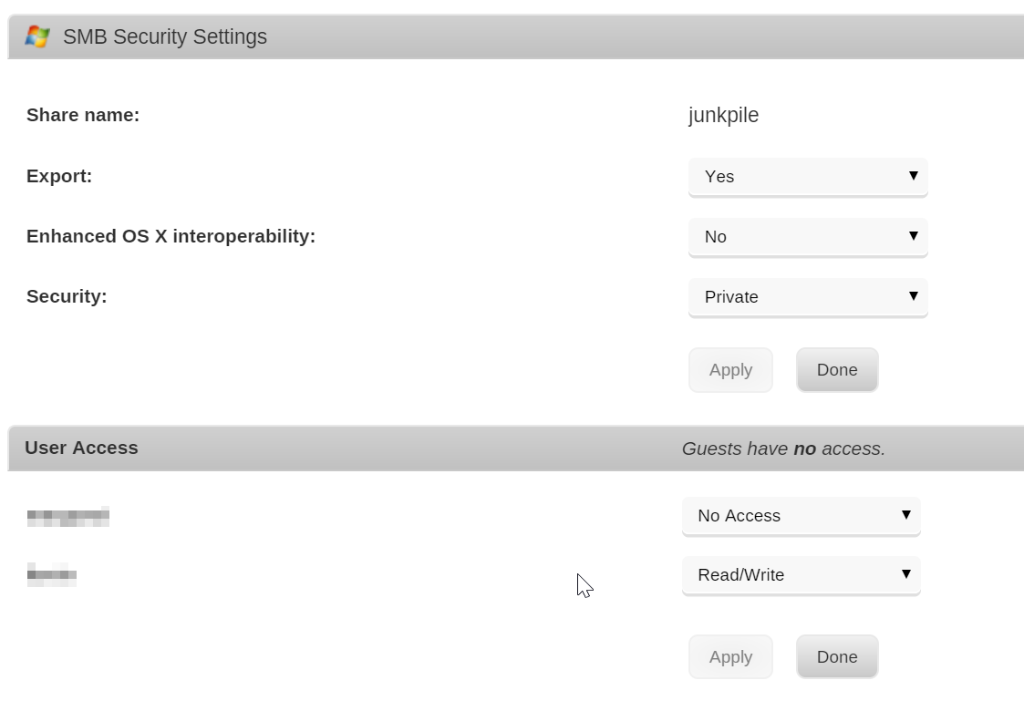
  • unRAID needs to have User Shares created to hold the virtual machine images; by default, these are created for you by a new installation at /mnt/user/domains/
  • Check to make sure that your User Share (above) has enough room for the full size of your Windows Operating System hard drive. You’re going to copy the entire hard drive including the empty space.

By default, most of these things were done already on my machine, but it’s good to check them before proceeding.

If you’re unfamiliar with unRAID and how to take those steps, they are described in the “System Preparation” section of the unRAID manual quite well.

Add a new Virtual Machine

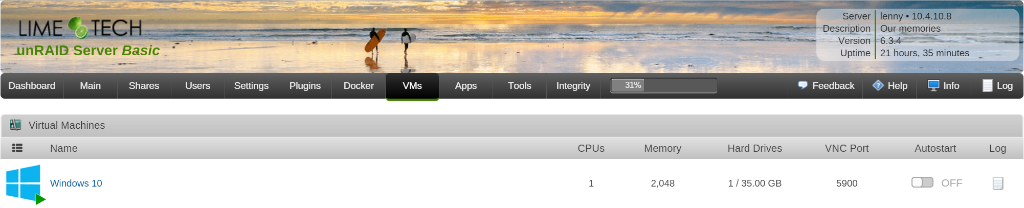
From your unRAID web UI (e.g. http://tower), perform the following steps.

  1. On the VMs tab, click the Windows 10 template (or template for your version of Windows).
  2. Click on the switch for the Basic View to toggle it to the Advanced View (in the upper-right corner of the screen) if it isn’t already set.
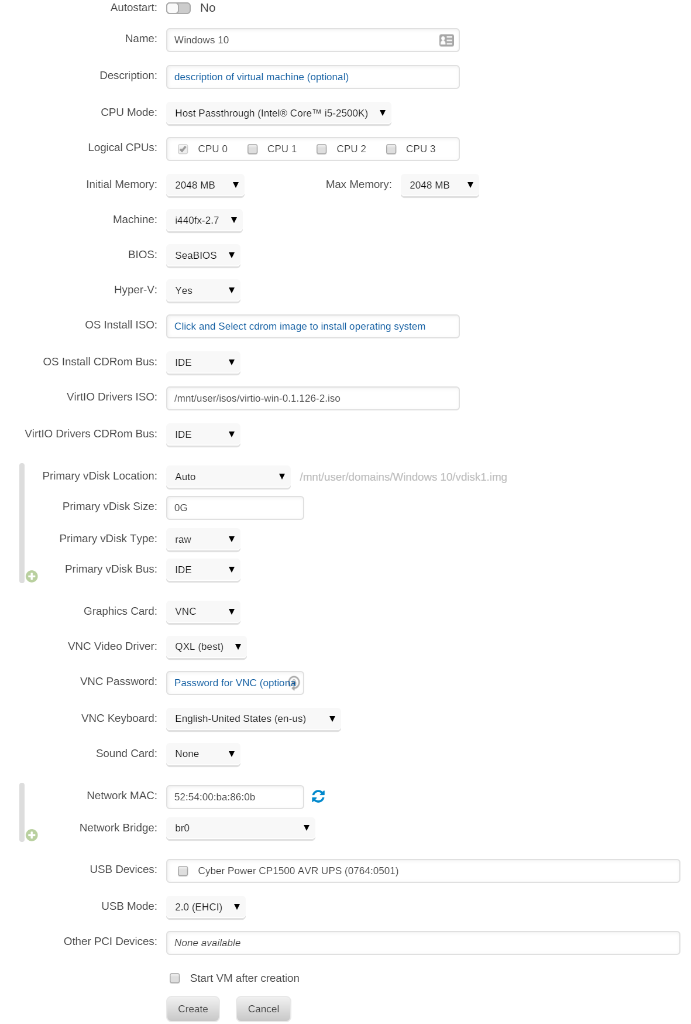
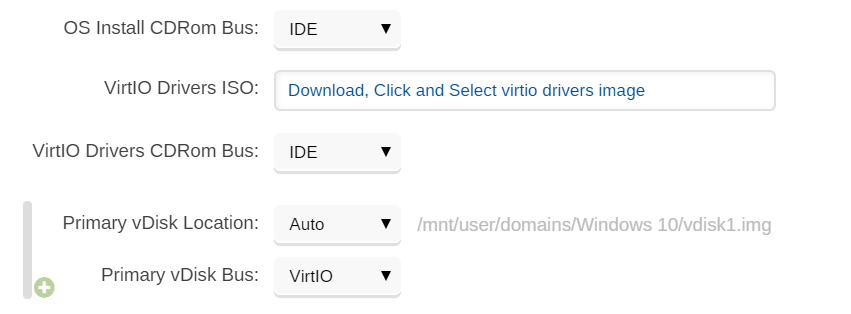
  3. Configure the VM with the following settings:
    1. Name your VM whatever you wish: For this example, I’m using “Windows 10”
    2. CPU Mode: Host Passthrough
    3. Logical CPUs: However many you wish (at least one)
    4. Initial Memory / Max Memory: at least 2GB is recommended
    5. Machine: i440fx-* (whatever the newest is)
    6. BIOS: SeaBIOS
    7. Hyper-V: Yes
    8. OS Install ISO: Leave empty
    9. VirtIO Drivers ISO: Select the virtio-win*.iso that (should have been) downloaded as part of enabling VMs on unRAID.
    10. VirtIO Drivers CDRom Bus: IDE
    11. Primary vDisk Location: Auto
    12. Primary vDisk Bus: IDE
    13. Primary vDisk Type: raw
    14. Primary vDisk Size: 0G (You’ll be overwriting this file in the next step)
    15. Graphics Card: VNC
    16. VNC Video Driver: QXL
    17. VNC Password: Set it if you’d like – this is how you’ll access the ‘screen’ of the running VM
    18. VNC Keyboard: Set to the right language for your OS
    19. Sound Card: None (or select one if your device supports passthrough)
    20. Network MAC: this is set randomly, though you can change it.
    21. Network Bridge: br0
    22. USB Devices: I recommend leaving all unchecked for now.
    23. USB Mode: 2.0 (EHCI) is what I found worked for me.
    24. Other PCI Devices: I recommend leaving all unassigned until you confirm the VM launches correctly.
    25. Uncheck Start VM after creation
  4. Hit Create.

Copy the OS Drive to an image

Next up, you need to copy the data from your OS drive to an virtual disk image that the VM can boot off of.

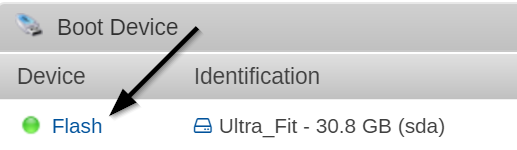
  1. Identify the disk that contains your Windows Operating System. You can find it by looking in the unRAID web UI in the Main tab under Unassigned Devices. Look for the drive that you booted windows off of before you installed unRAID. Make note of the disk id (e.g. sdb, sdc, sde, etc.)
  2. SSH into your unRAID system as root. By default unRAID doesn’t have a root password, but you should have set a strong one by now… right?
  3. Enter the following command to convert the physical disk
    qemu-img convert -p -O raw /dev/sdX /mnt/user/domains/Windows\ 10/vdisk1.img
    1. Replace sdX with the drive id for your Windows OS installaton
    2. Replace Windows\ 10 with the name you gave your Virtual Machine (if you need to see what it is run the ls /mnt/user/domains command to see what it’s name is on disk)
  4. Wait. It’ll take a while, assuming you have a reasonably large OS installation disk.

Start your Windows VM & Install the VirtIO Drivers

Because Windows is now running as a Virtual Machine on KVM, it will think there is new “hardware” and will require (and benefit from) having the right drivers installed.

  1. In the unRAID VMs tab, click on your newly created VM and click Start
  2. After the VM has started, you can VNC into the machine and interact with it. You can do this one of two ways.
    1. Click on the running Windows VM and select “VNC Remote”
    2. (Preferred) Install a VNC client like TightVNC and connect to the VM directly. To do so, you’ll need to know the IP address of your server and connect to the VNC port of the VM (which is listed next to the running VM)
  3. In Windows File Explorer, navigate to the VirtIO virtual CD-Rom (likely disk D:\)
  4. Navigate to Balloon > w10 > amd64
    1. Or your specific version of Windows and Architecture
  5. Right click on the .inf file (i.e. balloon.inf) and click install. (You may need to enable the viewing of file extensions to find the right file)
  6. Repeat the above process for each of the following folders
    1. NetKVM
    2. vioserial
    3. viostor
  7. You may want to check Windows Device Manager to make sure there are no devices which have yellow warning exclamations next to them – if so, you’ll likely need to install an additional driver.
  8. When done with the driver installation, navigate to the guest-agent folder and double click on qemu-ga-x64.msi to install the QEMU/KVM guest agent.

Shutdown the VM & update disk settings

Now that you know that the VM boots and you’ve got the drivers installed, you can stop the VM and update the physical disk to use the VirtIO bus which will give you better performance.

  1. Stop the Windows VM. You can do this one of two ways – one, by initiating a Shutdown from within Windows. Or, you can click on the VM image in unRAID and select Stop which will also gracefully shut down Windows.
  2. In the unRAID web UI, in the VMs tab, select the Windows VM and select Edit
  3. Change the following settings:

    1. Primary vDisk Bus: VirtIO
    2. VertIO Drivers ISO: delete the entry
    3. Restart the VM and make sure it’s operating correctly.

Reactivate your Windows license

Windows checks it’s license validity based on your machine’s hardware. Any time you change the hardware, Windows needs you to reactivate your license. You’ll need to run through the activation steps in the VM to re-activate your Windows license because Windows will think you just changed a lot of hardware.

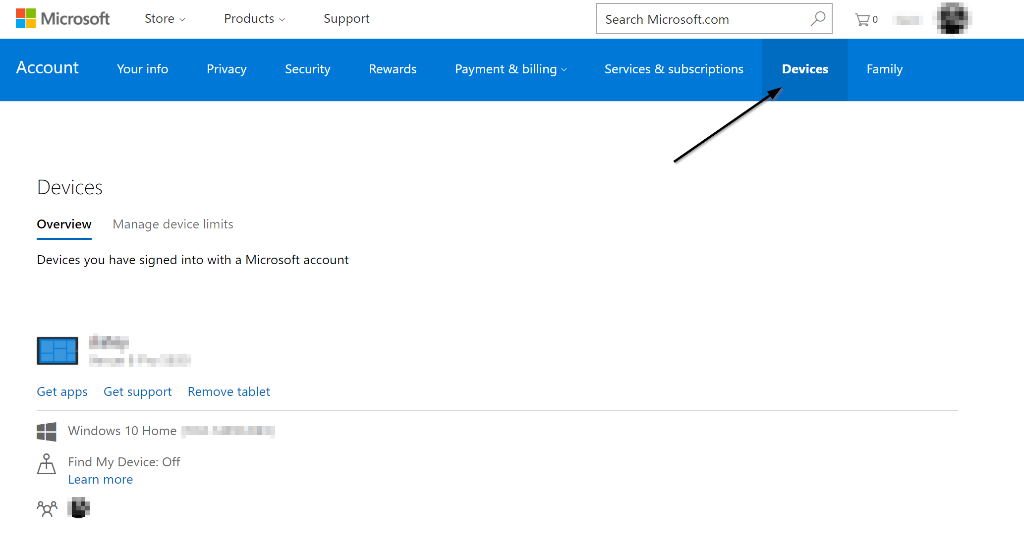
To do that, search for “Activation” from the Windows 10 Start menu. From there, you should be able to follow the prompts to activate your copy of Windows. Somewhere along the way, in smallish font, it’ll ask you if you recently changed hardware. Click that option and go from there – i.e. log into your Microsoft Account, select the machine/license associated with this Windows installation.

(Optional) Remove Unneeded Software & Drivers

Because your old Windows machine had a lot of device specific drivers installed on it to operate on your hardware, you may have a lot of cruft that can now be removed. Log into your Windows machine and take a stroll through the “Add or Remove Programs” menu to see if there’s anything that can be removed. For me, I could uninstall any Intel and RealTek Drivers, ASUS motherboard features, etc. that were no longer relevant. It’s a nice thing to slim up the now VM’d Windows OS.

(Optional) Optimize the Window VM

The unRAID wiki has a good set of steps to consider to optimize your Windows VM. I personally don’t believe in disabling the search indexer, but most of the other tips are worth while.

(Optional) Reduce / Shrink the size of the VM image

Now, you’re probably saying to yourself… geez, I don’t need a XXX GB image file that just happened to be the size of your old OS hard drive just to run Windows. You probably want to slim that down. Here’s instructions on exactly how to do that.

Let me know if I missed anything here.

How-to: Migrate from Windows RAID to unRAID

When I started looking at converting my Windows 10 Pro machine (which was running a two-disk, software RAID 1 in Windows) to an unRAID machine I didn’t find a lot of good how-to guides. Below are some guidelines and step-by-step instructions that will hopefully help if you’re in the same situation.

Basic Setup

Here’s my starting & ending setup. Yours is likely different.

All of this is running on a 5 year old ASUS Maximus IV Gene-Z/GEN3 motherboard with an Intel Core i5-2500k processor and 16GB of RAM.

The 4TB “Security Recordings” disk is used to hold my IP cam footage from my security software – I made space on that disk to temporarily hold the data from my RAID while I was doing the upgrade. More on that below.

Before you get started, it might be good to familiarize yourself with the unRAID manual. It’ll help to have a passing understanding of what an unRAID array and share is, and it’s a pretty good reference for how to do a general unRAID installation.

Migration Steps

These instructions assume you have a Vista-or-later Windows machine with two-disks in a Windows-managed software RAID mirrored configuration.

Before you shutdown Windows

  1. Backup everything. This is a good time to remind yourself that RAID is not a backup strategy. You should already have a 3-2-1 Backup Strategy. If you don’t, just stop reading right here and get one. Getting a good backup is really more important than this. I like Crashplan for cloud and on-site location backups. </soapbox>
  2. Save your Windows license key. If you have Windows 10, this is really really important. If you took advantage of the free Windows 10 upgrade, it’s really easy to lose that free upgrade if you don’t save your license key. The easiest way to keep the key is to create an Admin user that logs in using a Microsoft Account credentials. If you’ve done that right, you should see your PC listed when you log into account.microsoft.com and look in the Devices tab. If your device isn’t there, then you should get that resolved before you move on. Once you re-install Windows later, you’ll be able to log in using the same Microsoft Account and adopt this license key on your newly installed Windows 10 machine.

    Make sure this PC is listed under your Microsoft Account Devices
  3. Copy the data from the Windows RAID to a temporary (NTFS) drive. This has to be a drive you won’t be using as part of the initial 2-disk unRAID. We’ll use this as the source data to copy to the newly created unRAID array.In my case, I had a 4TB drive that I could copy my 1.5TB of RAID data onto temporarily so I could later use those 1.5TB drives for my unRAID array.Some tips:
    1. Protip 1 – make sure the temporary drive you’re copying to is not a Windows Dynamic Disk. You can check what type of disk it is by looking in the Windows Disk Management console. If it’s a Windows Dynamic Disk, unRAID won’t be able to mount it (neither can much else).
    2. Protip 2 – if you don’t have an extra disk big enough to hold the data from your existing array, you can use one of your disks as the source but you have to do a couple of additional steps.
      1. First, you have to break the Windows mirrored RAID apart (in the Windows Disk Management console, right click on the mirror, select “Break Mirrored Volume”). Do Not Remove the Mirror. Breaking it keeps the data in place on both disks. Removing it deletes the data from one of the disks.
      2. Second, you need to convert the disk you’ll use as the source data into a non-dynamic disk. Windows Mirrored volumes are always dynamic, so you’ll have to convert it so unRAID can read it. I used a program called TestDisk. The steps are essentially do a Create > Select Disk > select type “Intel” > Analyze > Backup > Press “Enter” > Write (Y) > Reboot. For detailed instructions, this walk through here was really useful.
      3. Third, when you go to create your unRAID array later, you’ll need to create an array that only has one disk (and no parity disk). After you’ve copied the data from the NTFS source disk to your new unRAID disk, then you can repurpose the source disk as your parity disk.
  4. Run a comparison. If you’re really paranoid, you can run a byte-by-byte comparison of the data in your source disk to your temporary disk to make sure they have the exact same data. I used Beyond Compare utilizing the binary comparison option in the settings.
    Beyond Compare Settings

    That is. You can now power down your Windows machine for the last time. Now would be a good time to do any drive swapping you intend to do. In my case, I actually pulled out one of the 1.5TB mirror drives and installed a new 4TB drive to use as my new parity drive for unRAID (future proofing for a larger array in the future).

Install unRAID

Installing unRAID should be pretty straight forward. Just follow the standard instructions to download it, get it on a USB flash drive, and boot your PC to the new OS. Once it’s loaded up, you should be able to navigate in your web browser to http://tower or http://server.ip.address.here

Setup unRAID Array & Shares

Next, setup your unRAID array and shares as you would normally. Whatever disks you assign to your array will be deleted. Be sure you pick the right disks to add to the array.

  1. Assuming you copied your data to a temporary drive, go ahead and setup your array with your two data disks. The array configuration is on the Main tab of the unRAID web UI.
    1. If you decided to use one of your Windows RAID disks as the source for your data to copy (Protip 2 above), be sure set up a single-disk array in unRAID without parity. And be sure the disk you assign to the array is the one you want to delete!
    2. If you plan to copy your physical installation of Windows to a Virtual Machine so you can boot and use it later, be sure not to assign your OS SSD as the cache device at this point.
  2. Once you get it all configured, start the array.
  3. Now that the Array is started, you can setup your shares. Setup your shares the way you’d like them, using whatever structure you see fit. I’ll assume you create a single share called “mirror” for these instructions.

Install Unassigned Devices & Mount Disk

The Unassigned Devices plugin will let you access the disk you’re using as your source data to copy. unRAID doesn’t normally mount drives which are not part of the array. This plugin makes that easy.

  1. On your unRAID web UI, navigate to Plugins > Install Plugin.
  2. Copy the URL below into the box for the “URL of remote plugin file or local plugin file”
    https://github.com/dlandon/unassigned.devices/raw/master/unassigned.devices.plg

  3. Click “Install”
  4. Navigate to the “Main” tab – you’ll see the disks which are not part of your unRAID array listed there.
  5. Find the disk that contains your source data. Click the (+) next to the disk to find the partition that contains the data and select “Mount”. The mount location will be listed (e.g. /mnt/disks/Purple in my case below).

Copy your data onto your the array

Now that the array and shares are set up, and the source disk is mounted, it’s time to copy your data to the array. The main thing here is to make sure the copy is identical – that the dates and times of the files, folders, and relevant attributes get copied correctly.

  1. SSH into your unRAID box. If you’re unfamiliar with SSH, I recommend getting a copy of Putty and learning how to use it to log into the server. It’s pretty handy.
  2. Use rsync to copy the data. Here’s the command I used. Obviously, you’ll need to change the source and destination to match where you’re copying your data. The nice thing about rsync is that it will pick up where it left off it it gets interrupted.
    rsync -aHAXvhW --no-compress --progress --info=progress2 --stats /mnt/disks/source/ /mnt/user/destination/

Finish setting up your unRAID

Your data should be now in it’s new home on your unRAID share. Next up you should look to complete the other installation steps in the unRAID manual if you haven’t already.

Some particularly important steps to take next:

There’s a lot more you can do with unRAID, obviously, but these ones I found to be pretty important as part of my initial config.

Happy unRAIDing!


Securing a new unRAID installation

By default, unRAID has a few pretty big security vulnerabilities which should be addressed immediately after installation.

My take is that unRAID is secure enough to operate within my home network behind a firewall, not exposed to the internet. Adding the steps here will make it more secure to protect against the unlikely, yet unfortunate possibility that someone nefarious gains access to your home network.

Here’s my list of steps taken to secure my unRAID install. If folks have more that I’m missing, I’d love to add them here!

Add password for root

It’s really bad that unRAID doesn’t force you to set a root user password as part of the installation. There’s really no excuse for this type ‘insecure by default’ philosophy when it’s so easy to fix.

So, to fix it yourself, go to the web UI and navigate to Users > Select ‘root’ > Add a Password.

It will take all of 30 seconds to do it.

Create users that aren’t root

It’s always a good idea to do as little as possible as the root account on a Linux system. While you’re on the Users screen, go ahead and make users for yourself and others you want to have access to shares. The only thing these users can do is access shares.

Restrict access to your shares

If you don’t have to expose a share via SMB, don’t! Just turn them off.

If you don’t have to give people write access, make them read only.

I prefer to set my shares that are available via SMB to “Private” for the Security level which gives guests no access, and then set the proper access control for each user in the house. To make the changes, just go through each share under the Shares tab and set your SMB Security Settings and User Access however you see fit.

Disable access to the /flash share

For some crazy reason, the USB drive that hosts the operating system is shared by default as /flash. I don’t remember if the default permissions on it are “Private” or not, but I think it’s a good idea to just not have it shared at all.

This one is trickier to find, however, because it’s not listed under the Shares tab. To find the controls, go to the Main tab, and click on the Flash drive link.

From there, set the Export to “No”.

Disable SMB1

The folks that built the SMB protocol are serious about telling people to stop using the first version for a variety of security reasons. Now, many of those might relate to Windows-only devices, but there’s no reason not to disable it on your Linux box as well.

Go to Settings > SMB  (Under Network Services). Under the SMB Extras add the following line text:

#disable SMB1 for security reasons
[global]
   min protocol = SMB2

Disable Telnet & FTP access

unRAID comes with Telnet and FTP enabled by default. That’s really pretty silly this day and age. If you want to access a command prompt, you should use ssh. If you want to transfer files, use anything but FTP.

The easiest way to disable them both is to leverage the Tips & Tweaks plugin.

  1. Install the Tips and Tweaks plugin by going to Plugins > Install Plugin and using the following URL:
    https://github.com/dlandon/tips.and.tweaks/raw/master/tips.and.tweaks.plg
  2. After it’s installed, navigate to Settings > Tips and Tweaks (under User Utilities)
  3. Find the “Disable FTP Server & Telnet” option and select “Yes”

Fix common problems plugin

This one is nice – it’s basically a health check on the unRAID system. It’ll scan logs, look at your current config, and help you find common problems that you may have overlooked.

You can install it by going to Plugins > Install Plugin and using the following URL

https://raw.githubusercontent.com/Squidly271/fix.common.problems/master/plugins/fix.common.problems.plg

You can learn everything you need to know about the Fix Common Problems plugin on it’s forum thread here.

Ransomware protection

I honestly don’t know if this plugin would help in the event of a ransomware attack, but I think the principle is sound and it’s a pretty low hassle way to add some protection. The recent WannaCry ransomware attack highlighted the need for some additional consideration for me.

The general idea is to create a honeypot of files and shared folders that, if modified, immediately trigger unRAID to go into read-only mode (and/or disable access to all shares). If someone tries to encrypt and delete your files, unRAID would simply cut off access. This is particularly useful since these shares can be accessed by all of your users on potentially vulnerable machines… so if one of their machines gets infected with randsomware, and it tries to access your unRAID shares (because those machines likely have the share passwords cached), unRAID can stop the attack from being completely successful.

You can read all about the Randsomware plugin here on it’s forum thread. To install it, I found it easiest to install the Community Applications plugin and search for it and install it from there.

Setup email notifications

This one is important so that you can be notified by the various plugins and unRAID itself about the condition of the server. This isn’t just about security, obviously, but also about the general health of the system.

For example, you’ll be notified about plugin and server updates which are available, hard drives that are too hot, errors that crop up, etc.

You can find the settings under the Settings tab > Notification Settings

Keep your server up to date

unRAID itself and all of the plugins are easy to update – just go to the Plugins tab and click the “Check for Updates” button. Then go through and update each plugin – including the unRAID OS itself.

If you run any Docker containers, unRAID will let you know if they have updates available as well on your dashboard (they’ll be a different color). For any VM you run, make sure to check for updates on them regularly as well.

Further Reading

There’s a good thread on the Lime Technologies forum – Is unRAID really unsecure? I would recommend reading that as well – there are some good pointers there about other basics not covered here, like making sure to keep your system up to date, maintaining good backups, etc.

My take is that unRAID is secure enough to operate within my home network behind a firewall, not exposed to the internet. Adding the steps above make it even more secure to protect against the unlikely, yet unfortunate possibility that someone nefarious gains access to your home network.