I’ve always been annoyed that the fans in my server spin all the time (wasting power, making noise) when they’re not needed. The only reason they’re there is to cool my hard drives – which aren’t in use half the time.
When switching to unRAID, I wanted to fix this. There is a plugin (Dynamix System AutoFan) that is supposed to do this, but it didn’t work for me. In reading through several forum posts, I found a shell script that many people use to control their case fans based on their hard drive temperatures. But it wasn’t straight forward to get it operating, so I thought I’d post the steps I followed to get it running.
These instructions are specific to unRAID v6, but may be useful for other Linux installations.
Discover your fan sensor kernel modules
By default, it’s likely that you don’t have the kernel modules installed to give the system access to your fan speed sensors. First we need to get that setup.
- Install the NerdPack plugin. It’s the easiest way to install Perl which is needed to discover your sensors.
- SSH into your unRAID machine as root.
- From the prompt, run sensors-detect. Answer “Yes” (by pressing Enter) to every question except the last prompt- you do not need to automatically generate the config file.
sensors-detect
The output will be pretty long, and result in the something that looks like the following. Copy this block of text – you’ll need it in the next step.
#----cut here----
# Chip drivers
modprobe coretemp
modprobe nct6775
/usr/bin/sensors -s
#----cut here----
Load the kernel modules at each boot
The modprobe commands will load the specific kernel modules for your hardware enabling your computer to detect, read, and control these fans. But we want to make sure they run each time you boot your machine – to do that unRAID, we have to modify the ‘go’ file that runs each time your machine starts.
- Open up your unRAID ‘go’ file in an editor
nano /boot/config/go
- Take the lines that start with modprobe from the sensors-detect output and add them to your ‘go’ file. Do not add in the ‘/user/bin/sensors -s’ line.
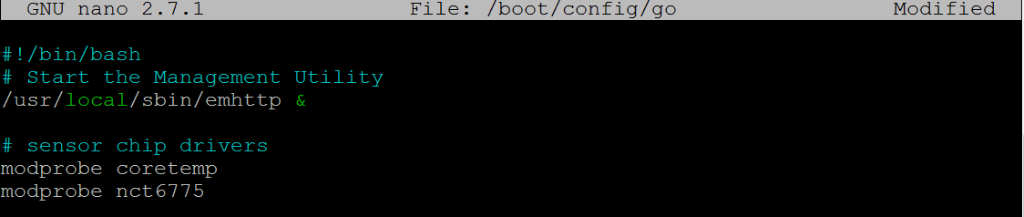
- Save and quit nano (Ctrl-X, Yes)
- Reboot your unRAID server. (Or, alternatively, you can run the modprobe commands from the command line to load the kernel modules without rebooting).
After you reboot (or run the modprobe commands), you can run the sensors command from a command prompt which should show you the status of all the temperature sensors your machine knows about.
Figure out which controls what
Next up, you’ll need to figure out which device controls what fan, as well as the minimum power that needs to be applied for a given fan to keep spinning.
Fans are controlled in Linux by assigning a value between 0 and 255 to the Pulse Width Modulated (PWM) fan header (0 is off, 255 is max power).
The pwmconfig tool runs through all of your fan headers and vary the power output to find out which fans are controlled by each header.
To run it, SSH into your machine and run:
pwmconfig
When prompted, answer “yes” to generating a detailed correlation.
When prompted to set up the configuration file, say “no”.
The output will be long. What you’re looking for are the following things.
Testing pwm control hwmon2/pwm1 ...
hwmon2/fan1_input ... speed was 1931 now 0
It appears that fan hwmon2/fan1_input
is controlled by pwm hwmon2/pwm1
Would you like to generate a detailed correlation (y)? y
PWM 255 FAN 1925
PWM 240 FAN 1859
PWM 225 FAN 1748
PWM 210 FAN 1648
PWM 195 FAN 1535
PWM 180 FAN 1415
PWM 165 FAN 1306
PWM 150 FAN 1184
PWM 135 FAN 1063
PWM 120 FAN 946
PWM 105 FAN 826
PWM 90 FAN 698
PWM 75 FAN 0
Fan Stopped at PWM = 75
- The path to the fan controls. Above the fan I want is controlled by hwmon2/pwm1
- The path to the fan monitor. Above that I can see that hwmon2/pwm1 is correlated to hwmon2/fan1_input.
- The setting (PWM) at which the fan stopped spinning. In this case, it was “75”.
Verify the correlation
You likely have two sets of fans (at least) that show up in the output. One of them is probably your CPU fan, which I’d recommend leaving under the control of your BIOS (it’s safer that way).
In order to make sure that you pick the right fan, I recommend doing a quick check. From the command line, you can assign a value to a fan to directly control the speed.
Replace the bold text below with the fan you want to control:
root@tower:~# echo 0 > /sys/class/hwmon/hwmon2/pwm1
root@tower:~# cat /sys/class/hwmon/hwmon2/fan1_input
0
You should also physically check that this shut off the fan you expect it to (i.e. your case fan stopped spinning, not your CPU fan).
Find the minimum fan start speed
Fans have momentum – because pwmconfig was working down from the highest-to-lowest speed, it found the lowest speed it would keep spinning after it was already moving. To find the starting speed, you have to work upwards from 0.
In my case, the “75” stopping PWM was not enough to get the fan to start from 0:
root@tower:~# echo 0 > /sys/class/hwmon/hwmon2/pwm1
root@tower:~# cat /sys/class/hwmon/hwmon2/fan1_input
0
root@tower:~# echo 75 > /sys/class/hwmon/hwmon2/pwm1
root@tower:~# cat /sys/class/hwmon/hwmon2/fan1_input
0
root@tower:~# echo 85 > /sys/class/hwmon/hwmon2/pwm1
root@tower:~# cat /sys/class/hwmon/hwmon2/fan1_input
0
root@tower:~# echo 95 > /sys/class/hwmon/hwmon2/pwm1
root@tower:~# cat /sys/class/hwmon/hwmon2/fan1_input
402
Install a fan monitoring script
Now that we know how the fans are controlled, and the minimum speed to start them, we can plug that into the fan script along with some other inputs.
Get & edit the script
I started with this version the the script and modified it to add a few features. You can download my version or the original. I’ll assume you downloaded mine.
- Make a directory to hold your scripts (if you haven’t done so already). From the command line:
mkdir /boot/config/scripts
- Download unraid_array_fan.sh
- Move it to /boot/config/scripts
- Edit unraid_array_fan.sh with your specific settings discovered above.
nano /boot/config/scripts/unraid_array_fan.sh
- Set NUM_OF_DRIVES to match your number of hard disks. Be sure to edit / comment out the specific device identifiers you want to key off of (i.e. sdb, sdc, etc.) I’d recommend eliminating any SSDs.
- Set the FAN_LOW_PWM to the ‘Fan stopped at PWM’ reported by pwmconfig
- Set FAN_START_PWM to the speed discovered through manual testing.
- Set the ARRAY_FAN to match the path of the device you want to control.
To test out the script, you can run it from the command line directly.
/boot/config/scripts/unraid_array_fan.sh
Set the script to runs at boot
Last thing that needs to happen is to make sure that the script runs at boot, and runs periodically to adjust the speed.
To do that, we’ll add the script to crontab. unRAID is a lil strange in that you have to do this via some go-file hackery plus an additional script
- Download mycrontab.txt and move it to /boot/config/scripts/ – it contains the following cron entry which runs the script every 5 min and puts the output into the unRAID system log.
# fan control - every 5 min
*/5 * * * * /boot/config/scripts/fan_control.sh 2>&1 | /usr/bin/logger -t fan_control
- Open your go file in an editor
nano /boot/config/go
- And add the following lines at the bottom
# setup crontab
crontab -l > /tmp/file
echo '#' >> /tmp/file
echo '# Start of Custom crontab entries' >> /tmp/file
cat /boot/config/scripts/mycrontab.txt >> /tmp/file
echo '# End of Custom crontab entries' >> /tmp/file
crontab /tmp/file
rm -f /tmp/file
- Save (Ctrl-X, Yes) and then Reboot your machine
You can check to see if the script is running automatically by looking in your unRAID log file (and observing your fan speeds).
Final notes
You may want to adjust the FAN_OFF_TEMP and FAN_HIGH_TEMP to tune when the fans come on and off for your particular application.
Finally, I have to thank all of the various folks who created the original script, who’ve posted on the unRAID forums, the unRAID wiki, etc. I pieced this together from a lot of good information from the folks that have done this before me.
If there’s a better way to do this, I’d love to hear it. And I welcome contributions to the script on GitHub, continuing the work of those that have come before me.
Hello,
Works great, but I got I little problem with reading temp from my LSI SATA Card.
But this fix it:
line 91 (org):
CURRENT_TEMP=`smartctl -d ata -A ${HD[$CURRENT_DRIVE]} | grep -m 1 -i Temperature_Celsius | awk ‘{print $10}’`
to:
CURRENT_TEMP=`smartctl -A ${HD[$CURRENT_DRIVE]} | grep -m 1 -i Temperature_Celsius | awk ‘{print $10}’`
Thanks for this! Had the same problem with some western digital drives through a card.
Hi Kevin, great writeup, however I am stuck on the step using the pwmconfig tool. Response is “there are no pwm-capable sensor modules installed.”
My motherboard is a MD70-MB0 (Gigabyte) – I know the fans SYS_FANS are all PWM, I can vary the speed in the IPMI interface. Though it applies to all the fans, which is not what I want to do!
any ideas?
regards
John
Any chance we could get a plugin? As you mentioned, currently “Dynamix System AutoFan” is the only way to do this (and it seems to be broken for most people).
Thanks!
I know this is a few years old but when I tried “sensors-detect” I get this:
bash: /usr/sbin/sensors-detect: /usr/bin/perl: bad interpreter: No such file or directory
perl is required for that tool to work. You’ll need to install the Nerd Pack (Nerd Tools) Plugin, and configure it to enable perl:
https://forums.unraid.net/topic/35866-unraid-6-nerdpack-cli-tools-iftop-iotop-screen-kbd-etc/
Hi!
thanks for your great tutorial
I am not able to get any PWM sensor when running “pwmconfig”
I posted my problem in reddit: https://www.reddit.com/r/unRAID/comments/n5kovv/unable_to_control_fans_in_asustor_as6212rd_pwn/
is there another way to workaround this?
thanks in advance!
It’s really hard to say, but my guess is that there’s a missing driver or a conflict. Check out:
https://askubuntu.com/questions/114490/fan-not-detected-by-lm-sensors
First off, thanks for this post. I’ve been struggling with the AutoFan plugin for months. This article has helped me gain a much better understanding of how things work. I have a couple questions I’m hoping you may be able to help with.
First is there a way to change the labels of the fans? This way when I look in Unraid there is a more descriptive label (Like CPU Fan, drive array 1 fan, etc..)
Second, how can I set the ARRAY_FAN value for multiple fans? I have 2 rear case fans, and 2 drive array fans. When any of my drives get hot I’d like to have all those fans go from an idle of <500rpm to a fast spin and get the drive(s) cooled back down. How can I configure the script to control multiple. In my case it would be:
/sys/class/hwmon/hwmon2/pwm4
/sys/class/hwmon/hwmon2/pwm5
/sys/class/hwmon/hwmon2/pwm6
/sys/class/hwmon/hwmon2/pwm7
Thanks for the help!
I’d like to know this too.
Did you figure this out?